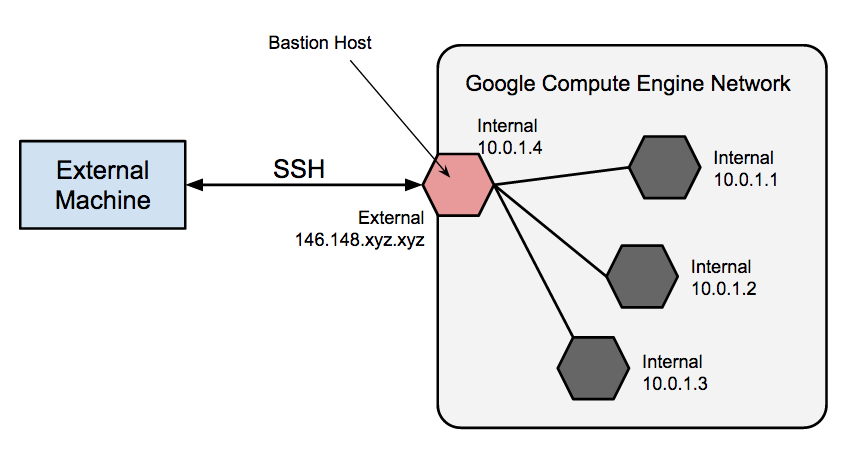
This post describes how to connect to a GCP VM instance via SSH behind a firewall. There are two options: SSH over HTTPS or SSH over IAP. The first option is the easiest to set up. The second option is more secure, but it requires more steps to set up.
Method 1: SSH over HTTPS
In this method, we will explain how you can make a SSH connection over the HTTPS port. Most firewall rules should allow this, but some proxy servers may interfere.

Firstly, within your VM instance (either SSH via the web browser from the Compute Engine -> VM Instances section or a terminal within a notebook) we need to append the /etc/ssh/sshd_config file to change the default SSH port from 22 to 443. We can do this directly by running:
sudo sed -i -e "/#Port /c\Port 443" /etc/ssh/sshd_config
After this, you need to restart the VM instance, or at the very least restart the SSH service on the VM by running:
sudo service ssh restart
sudo service sshd restart
For the next steps, we need to modify the firewall rules in order to allow SSH via HTTPS. We can do this directly within the VM instance settings within Compute Engine, but here we will do this via command line using the Google Cloud CLI.
You can install gcloud CLI via the instructions here, but if you use vscode then a better way would be to install the Cloud Code extension which comes with the Google Cloud SDK and gcloud. After this has been completed, you can set up the current project by running the following within a terminal window:
gcloud config set project PROJECT_ID
Then you can run the following command to add the neccessary firewall rules:
gcloud compute firewall-rules create allow-ssh-via-https --action=allow --rules=tcp:443
You may need to ask the project owner(s) to the add the role to add firewall rules to your account. You can see view the roles and permissions from:
gcloud projects get-iam-policy PROJECT_ID --format=json
You can start the VM instance by running:
gcloud compute instances start INSTANCE_NAME
Now we can generate the SSH keys and test the connection by running:
gcloud compute ssh USERNAME@INSTANCE_NAME --project=PROJECT_ID --zone=ZONE -- -P 443
This should open a PuTTY window which will connect to the VM. If successful, you should see the bash terminal appear from your VM.
In order to establish this connection directly (required for vscode), we can set this up in the SSH config automatically by running the command:
gcloud compute config-ssh
This will append the file~./ssh/config in your user directory (c:\users\USER\.ssh\config on windows) with the VM instances that are currently running or assigned a static IP adddress. You should see the following for each of the VMs within the project:
# Google Compute Engine Section
#
# The following has been auto-generated by "gcloud compute config-ssh"
# to make accessing your Google Compute Engine virtual machines easier.
#
# To remove this blob, run:
#
#   gcloud compute config-ssh --remove
#
# You can also manually remove this blob by deleting everything from
# here until the comment that contains the string "End of Google Compute
# Engine Section".
#
# You should not hand-edit this section, unless you are deleting it.
#
Host INSTANCE_NAME.ZONE.PROJECT_ID
    HostName INSTANCE_IP
    IdentityFile C:\Users\USER\.ssh\google_compute_engine
    UserKnownHostsFile=C:\Users\USER\.ssh\google_compute_known_hosts
    HostKeyAlias=compute.xxxxxxxxxxx
    IdentitiesOnly=yes
    CheckHostIP=no

# End of Google Compute Engine Section
This will also be required if you want to connect to your VM instance via SSH in vscode via the Remote - SSH extension. Once this has been added, you will need to modify it so that it can be used with the right port (443) and username (as your local username is likely different to the one set on GCP), so the final config should look like:
Host INSTANCE_NAME.ZONE.PROJECT_ID
    HostName INSTANCE_IP
    Port 443
    User USERNAME
    IdentityFile C:\Users\USER\.ssh\google_compute_engine
    UserKnownHostsFile=C:\Users\USER\.ssh\google_compute_known_hosts
    HostKeyAlias=compute.xxxxxxxxxxx
    IdentitiesOnly=yes
    CheckHostIP=no
This should complete the set up, and you can connect to the VM instance by running:
ssh INSTANCE_NAME.ZONE.PROJECT_ID
or by using the Remote - SSH extension on vscode.
You may also need to configure your proxy settings to allow the connection to be made by running the following commands:
gcloud config set proxy/type http
gcloud config set proxy/address proxy.testcorp.com
gcloud config set proxy/port 8080
# optional:
gcloud config set proxy/username user001
gcloud config set proxy/password XXXXXXXXXXXX
Method 2: SSH over IAP
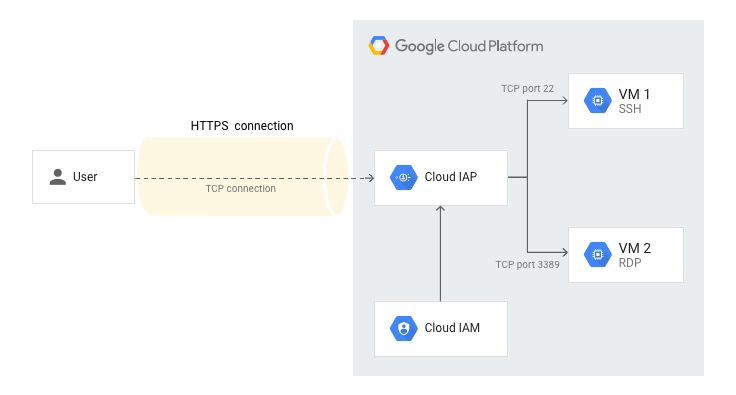
Identity-Aware Proxy (IAP) is a managed service that can control the access to your VM. It allows you to authenticate user TCP traffic through IAP before sending it to your VM instances. This also works for private VM’s without an external IP address.

In order to establish the connection over IAP, we need to add the firewall rules and user role to your account. This can be done directly via the webbrowser within the Compute Engine section, but here we will do this via the gcloud CLI.
Firstly, we need run the following command to set up the firewall rule to allow connection from IAP:
gcloud compute firewall-rules create allow-ssh-ingress-from-iap --direction=INGRESS --action=allow --rules=tcp:22
You also need to add the role permission (iap.tunnelResourceAccessor) to your user account to allow for connection over IAP:
gcloud projects add-iam-policy-binding PROJECT_ID --member=user:USERNAME --role=roles/iap.tunnelResourceAccessor
This will require a certain level of access on the project, and if you get the following error:
ERROR: (gcloud.projects.add-iam-policy-binding) User [USER-EMAIL] does not have permission to access projects instance [PROJECT-NAME]
Then you may need to ask the project owner(s) to the add the role to your account. You can see view the roles and permissions from:
gcloud projects get-iam-policy PROJECT_ID --format=json
After this has been completed, you need to establish the connection by running:
gcloud compute ssh USERNAME@INSTANCE_NAME --project=PROJECT_ID --tunnel-through-iap --zone=ZONE-- -P 22
IAP TCP tunnels data through the domain tunnel.cloudproxy.app. This domain is owned by Google. You should ensure you are not blocking any traffic to this domain. If you block traffic to this domain you will be unable to use IAP for TCP and you may see the error message:
Error while connecting [[SSL: CERTIFICATE_VERIFY_FAILED] certificate verify failed
In order to resolve this, you need to complete the following steps:
1) Ask your friendly proxy admins to add the following to allow list:
wss://tunnel.cloudproxy.app
2) Configure your current GCLOUD_SDK environment
gcloud config set proxy/type http
gcloud config set proxy/address proxy.testcorp.com
gcloud config set proxy/port 8080
# optional:
gcloud config set proxy/username user001
gcloud config set proxy/password XXXXXXXXXXXX
3) Make sure you have correct SSL Certs installed on your workstation. You can configure GCLOUD_SDK to use your certs using the following command:
gcloud config set custom_ca_certs_file /Users/user01/gce/certs/corpcerts.pem
If you have any issues with any of the methods or steps above, please see the troubleshooting ssh user guide. Also the using IAP for tcp forwarding user guide.